
How To Make the Breathe Circle Filter
Recently, I felt inspired by the Calm Breathe Circle which is a really great, minimalistic tool. I re-created it in Spark while taking a few creative liberties.
You can try the finished filter out here!
Mile High View
In order to bring this effect to life, we’re going to need a few things:
- A circle (lol)
- An animation that causes said circle to expand and contract over time
- A few sounds to increase the immersion of the effect
- A dash of purple gradient to make the effect look cool, and emphasize the user’s face
Here’s our overall workspace:
Overview of what we’re creating
Let’s break each of these down!
The Circle
The circle is the cornerstone of this effect. It is what the eye will be drawn to when someone uses the filter. In order to make the circle I just created a blue circle in Canva. I then took this circle and put it into LunaPic to make the background transparent. You can do that in Canva too, but I don’t want to pay for the pro version 😉!
I then imported the circle into Spark and put it on a full screen rectangle.
The Infamous Blue Circle

You can create a rectangle by pressing Add Object > Rectangle
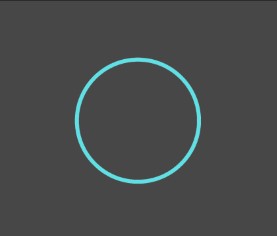
Next, I extracted the camera texture to use as the material for the full screen rectangle.
Gimme that texture!!
Next, create a rectangle for the breathe material, and place it on top of the camera texture rectangle.
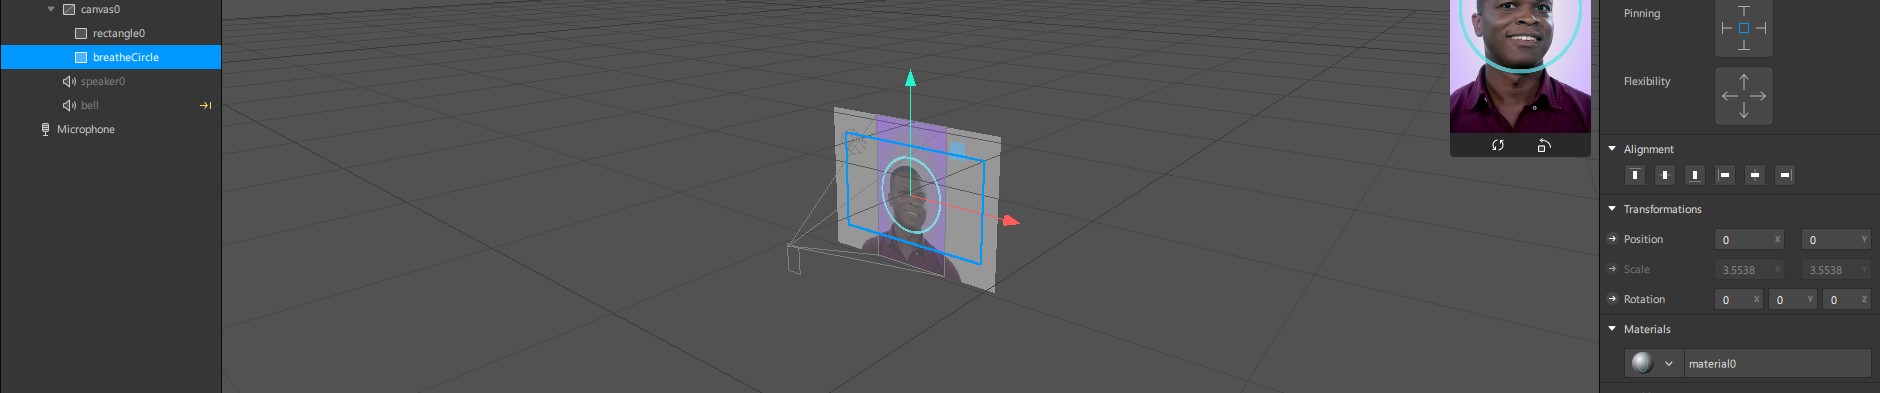
You can put one rectangle on top of another by moving it under, kinda like Photoshop
Audio
To set up the audio, we need to do a few things:
- create an Audio player
- download some audio files
- use a controller to trigger sounds when called
I used two sounds in this effect: a looping rain sound, and a bell sound that triggers every time the circle hits it’s smallest point.
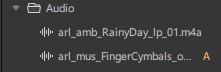
The two audio files used in the effect
The Patch Controller
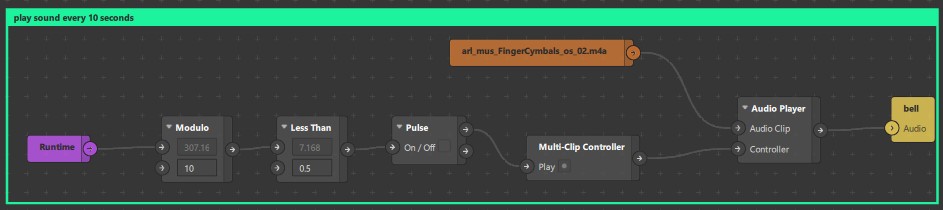
Use a Multi Controller to trigger sounds
This part includes a bit of logic. We track how long the filter has been running with Runtime. We then use modulo and less than to send a pulse every time runtime / 10 < 0.5. This pulse triggers the Multi-Clip Controller and sends our Audio signal to our speaker. Neat!
The Purple Gradient
In order to create the purple effect, we need to create a gradient patch and attach it to a material.
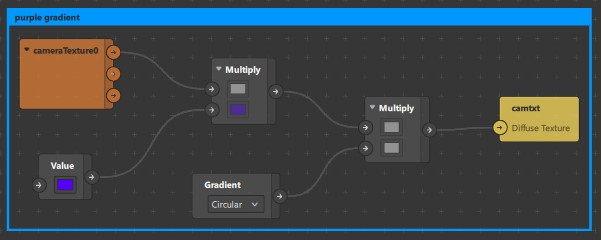
Purple HAZE
To create the effect, we grab the camera texture from earlier by dragging it onto our patch editor. then we take a color value and multiply them together. Multiplying creates the cross between two textures. Next, multiply that by a circular gradient. This causes the effect to taper off towards the middle. Finally, route that into the material of the rectangle. Done!
Animation
I saved this part for last, since in all honesty, it’s the most complex part of the workflow. While it’s possible to create animations using the patch editor, I find it easier to use JavaScript directly.
Here are the steps:
- Load in all required libraries from SparkAR
- Find the
rectanglethat contains our transparent breathe circle - Get the
materialthat holds theopacityof the effect - Set the parameters for the
time driver, like how many times the animation should complete, how long it should take, etc. - Instantiate the
time driverby usingAnimation.timeDriver(inTimeDriverParameters) - Set up a
sampler. There are many different options you can use to mess with the easing of the animation (how fast it goes in/out). For this animation, I’m usingeaseInOutQuad()which mimics the human lungs. They quickly expand or deflate, and taper off as they get close to full or empty. - Combine the
time driverand thesamplerby using theAnimation.animate()method - Modify the scale (the size) of our circle as the animation moves along. The first variable is x and the second is y
- Same as #6-8 for the
opacityof the material. Controls the “blueness” of the effect - Start the animation using
timeDriver.start()!
Below is the full code excerpt :)
// 1.
const Animation = require('Animation'); // to control circle movement
const Scene = require('Scene'); // so we can get "child" objects in the scene
export const Diagnostics = require('Diagnostics'); // so we can log our results to the console
const Materials = require('Materials'); // so we can edit the opacity of the circle

// 2.
const breathCircle = Scene.root.find('breatheCircle');

// 3.
const breatheMat = Materials.get('material0');


// 4.
const inTimeDriverParameters = {

    // The duration of the driver
    durationMilliseconds: 5000,

    // The number of iterations before the driver stops
    loopCount: Infinity,

    // Should the driver 'yoyo' back and forth
    mirror: true

};

// 5.
const inTimeDriver = Animation.timeDriver(inTimeDriverParameters);

// 6.
const inQuadraticSampler = Animation.samplers.easeInOutQuad(1.2, 3.9);

// 7.
const inTranslationAnimation = Animation.animate(inTimeDriver, inQuadraticSampler);

// 8.
breathCircle.transform.scaleX = inTranslationAnimation;
breathCircle.transform.scaleY = inTranslationAnimation;

// 9.
const opacityLinearSampler = Animation.samplers.linear(0.2, 0.95);
const opacityAnimation = Animation.animate(inTimeDriver, opacityLinearSampler);
breatheMat.opacity = opacityAnimation;

// 10.
inTimeDriver.start();
Conclusion
And that’s it! Thanks for reading, and have fun making filters.